Sunday, October 27, 2013

Little dino 1st birthday party

Since I've been blogging lots about our upcoming 2nd birthday monster party I thought I'd add in a post about our last birthday party. My son's first birthday party was slightly combined with my husbands return from deployment and his missed birthday a month before. So, lots going on for one little boy's birthday. Although the day was aimed at the little birthday boy, there were only 2 kids who attended his birthday. Luckily he was 1 and didn't care too much. I was a little less focused on things for him at the party and more at fun for the party-goers.

We did a birthday boy shirt, I think this is something we will do every year since its very fun.

This cake I made for my husband, it was green inside too. I used the Whipped Cream brand frosting and it was so delicious, I recommend that if normal frosting isn't a big hit for you to try their stuff.
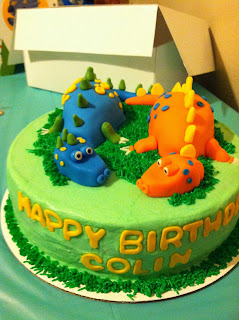
This was his smash cake. We purchased the cakes this year but I don't think we will do this again. His cake was mostly frosting and I think that I could show off my baking skills a bit and try something at home.

This was the star of the party for me. Special ordered and all. Although I wasn't a fan of the frosting or the cake, the decorations were super cute and everyone loved them. 

Minion Pumpkin

I must admit that I love the Despicable Me movies, such fun, and the minions are so adorable. This year I really wanted to dress our son up as a minion but we went with a monkey instead (its very fitting for him). Anyways to get my minion *fix* I got crafty and made a minion pumpkin.
Now he isn't perfect, I noticed after gluing his goggles on that they are a little off center, he also could use a few more pipe cleaners for his hair, and I could have done something to cover up the glue. However, for this year at least, he will do. He turned out pretty darn cute though if I do say so myself. I free handed all the painting (just used some acrylic paint I had on hand), but it was fairly simple and its a pumpkin which makes it difficult to have perfectly straight lines anyways. He's fun and happy and that's what I was going for. 

Friday, October 18, 2013

Lil man's Alphabet

For my birthday last year I decided to do a big craft for my son's bedroom wall. I had fallen in love with some ideas off Pinterest about wooden alphabet letters so I made a plan and went for it. I found on Etsy Alphabet Boutique 123 wooden letters with different styles for each letter and they were all ready to be painted. So I ordered these:

I then headed over to Michaels Crafts (2nd favorite craft store, Hobby Lobby is just too awesome) and found a variety of acrylic paints. Rather than the typical rainbow I wanted more masculine colors that would fit with the colors I had in his room (Earthy, "pond themed' colors). Then every night and some nap times too I would paint a couple letters. They all took 2 coats and then a coat of varnish so it was a lot of painting since there were was so many different colors, lots of cleaning brushes to switch colors. Finally I finished them all and was able to hang them up which gave me this:
I did take my time hanging them, I used a level to keep them straight and marked the middle of the wall to work out so that I could keep each row centered. I am so happy that is how they turned out. I love finding crafts that I can show my creativity and enjoy making without feeling self-conscious. Although my son is only two when I had to take these down when we moved he was very upset, however the excitement when I rehung them in our new home was wonderful to see. 

Sunday, October 13, 2013

Monster Birthday Party

I started planning my Son's 2nd birthday way in advance because thanks to Pinterest I have so many fun ideas to make/bake/create. I am trying to stick to a budget for his party but make it really fun. I decided upon a monster theme, not scary monster, but super cute little monsters. I have been scouring the internet for free monster clip art or something cute little monster for his invitation (since that is where the party should start). I'm going back and forth between making his invitations or having some printed. Pinterest has lots of options thankfully so hopefully I can figure something out soon since its just a few weeks out.
First thing needed is invitations. Wishing Tree Designs had a great sale going on so I was able to order his invites online for less than $1 each and they turned out great!


Next is part of the party decor/party favor. I saw on Oriental Trading and on Pinterest this idea for plush monsters for "adopt a monster" as party favors, plus they look super cute around the party. However, I was trying to stick to a budget so I decided I'd sew! I borrowed a friend's sewing machine to help me out, however much was done by hand. I found a few monster plush's that I liked and cut out patterns similar, some monsters needed some customization to look more like monsters than amoebas. A trip to JoAnns Fabrics and I picked up some felt for the eyes and fangs and chose 3 colors of flannel to do the monsters in. After a couple weeks of sewing during nap time and in the evenings, since sewing with a toddler awake seemed like a troublesome idea, I ended up with 24 cute stuffed little monsters that cost me about $10 to make. They are so adorable and I can't wait to have them at the party!
I covered play dough containers with construction paper and made little monster faces. 

We also have Mini monster beach balls, monster stickers and fruit gummies to finish off the goody bags.

A requirement for each year is the birthday shirt. This year we had some issues getting it, but once it finally came all the stress was worth it. 

And although my big dreams with lots of cake pops didn't happen, his cake turned out great. Its a 3 layer fun-fetti cake. I used leaf green gel tint added to regular vanilla frosting and piped it on with a star tip. His eye is a cake pop covered in white chocolate, fangs are also white chocolate. His mouth was melted semi-sweet chocolate chips, his pupil was also done with the chocolate chips. I broke his mouth a little bit on the left side, but used a fang to cover it up and no one even noticed, besides myself of course. 


We also had a fun Monster Melon! Start carving the mouth like you would a pumpkin. Once you are able to remove the mouth area, I used a melon baller to get out all the melon I could. Then I started filling the melon with a mix of watermelon, cutie segments, grapes, blue berries, strawberries and fresh pineapple. I used the ends of a banana (gave the middle to my son to have as a snack) and used toothpicks to stick them on top of the melon. 


Here was my Pinterest fail. I did this jug idea with the drink mix (not my picture). I added the powdered lemonade but after putting the spout back on (it just popped on and off) I could not get the jug to stop leaking. So I ended up just setting out several glasses of lemonade that I had poured and the jug had to sit in the sink. We had juice boxes for all the kids so they didn't even care much about my great lemonade attempt. 

We also served a veggie tray (included cucumber, carrots, broccoli, and cherry tomatoes), a meat/cheese/cracker tray, munchies (since my son loves Cheetos) and a main dish of chicken nuggets and tater tots. In the living room we had the slide, the pop-up tent with tubes filled with ball pit balls. The dining room was the center of food and presents along with decorations. In the dining room we had streamers to each corner with balloons at the corner. The sliding door had the banner of balloons above it. Then the ceiling had spirals and monster cutouts (from hobby lobby).
After food, cake and ice cream we took the kids out to run around at the playground out front. We also pulled out the bubble machine. Being the party was for a two year old we figured most party games would be a bit much and stuck with ball pit tent and a bubble machine as the fun events at the party. The party lasted for about 2 1/2 hours, but most the the kids were more than done at that point. Although everything wasn't exactly as I planned it went great and I can't wait till next year!




Pinterest Craft 1 - Coins from our travels

I will admit I am the worst traveler. I can have it all planned out and have everything I need, but I just unravel and hate life when I am away from home. That being said, I still have been very fortunate to have traveled some. My husband, the wonderful man he is, took us on a honeymoon to England and Scotland in 2009. We visited London, York, Edinburgh, Loch Ness, Bath, and Chester. I believe we had a few tours that took us to a couple other cities but these were the highlights. Anyways, this is where I decided we needed to keep some of the coins. Something about the currency there fascinated me so we tried for one of each denomination. Well once we got home these coins sat in a bag with other mementos from our trip till just recently, four years later, I figured out what to do with them.
Obviously we need some more traveling to finish this up but it is a good start. Included is the coins from England and Scotland as well as my husband has been awesome and brought me home some coins from his deployments which took him to South Korea, Philippines, Japan, and Guam. I am in no rush to get back traveling to finish this, but I have a long life left and hopefully this project can grow closer to being completed with Adam continuing his career in the USMC and maybe some more vacations for us too.

The Car Table

So my awesome friend moved away and I absorbed many items that she didn't wish to take with her on her move across the country. One of the items I was left with is this:
Its a Kidcraft table, perfect for toddlers. It has two chairs and 4 plastic bins to fit into the base where the bars are. After fixing up the top that was broken and lifted right off, filled some holes and gave it a good scrubbing I was ready to begin. 
I felt a little limited with this table because of its size and all the ideas I wanted to do with it. For a train table it needed to be bigger, I could do Legos but our toddler isn't ready for small plastic things yet (He is the reason they have warnings on toys for children under 3). So cars its was. Surprisingly Pinterest wasn't useful for this project (Don't worry, I have many more projects to come from there).
So first step after it the repairs was to paint it with primer it to give me my platform!
I was a bit excited to start on the top since that is main focus so I got out some painters tape and a ruler and got to work. It took about 2 days of taping since I ran out and had to get more, but once it was done I was able to paint the roads (below, left) then added more tape for the yellow dashed line (below, right). 
 

Now the fun could start. I wanted this table to be so unique and fun. I Googled around for ideas but once I was into it, this table was all mine and It was going to reflect our family and what my son would recognize. I dug into my huge stash of scrapbook paper, and started cutting. Most buildings were done with a simple ruler and I free handed any non straight lines. Once every building was assembled I purchased some Mod Podge (Purple label for the hard coat to handle all the use this would one day get). A few layers later and here is my finished top.

I'm in love with how it turned out. The parking spaces fit hotwheels, There is an Exchange (with an EGA and the green shirt all marines wear) and Commissary to represent our lives on Camp Pendleton. I still have the two little chairs, the plastic bins and the base of the table to work on, this is a big project but I have enjoyed every bit of it. Crafting is like meditation to me and after an hour or even 15 minutes I can feel my happiness increase and any stress just disappear.
I'll complete this post once I finish the table which hopefully will be before our monster birthday party in December so it can be utilized at the party.